Categories
Tech

.this and that

One of the concepts in JS that really perplexed me when I started learning about it years ago was the this keyword. When arrow functions were introduced in ES6, they brought with them a new relationship to the keyword this. I remember trying to educate myself on the different ways this could be affected by where functions were called or defined, and my brain would explode. I was overwhelmed by trying to understand the nuances, especially when it came to arrow functions.

However, at this point in my career, I have a much better understanding of this word means, and what the value of this will be when it is referenced.

In the words of Bruno Mars: ‘Don’t believe me? Just watch…’

The two most important things to my understanding of this were:

  • This = the function invocation context. Invocation = calling.
  • Functions which reference this are most likely methods (ie functions defined a property of an object)
  • The value of this is determined by
    • HOW the function is defined
    • WHERE it is called/invoked
    • Whether of not you are in strict mode

I think it can be a bit confusing that the value of this is called the invocation context, but it does not just defined by where it is invoked: it’s also affected by how its initialized or declared.

But lets not get ahead of ourselves. Lets start with a simple function declaration that just prints the value of this.

function printThis () {
   console.log('this =', this);
}

printThis();
//this = window

If we call this function, we get the automatic value of window. A functional declaration has the implicit invocation context of the window.

However, if we define the function as a property of an object, we will get a different this value.

const someObject = {
    testingThis: printThis()
};

someObject.printThis()
//this = someObject

So when we call printThis as a method of someObject, we get a this value of someObject!

But, suppose that we want this to be something specific! We want to ensure that the value of this refers to a particular context. We can perform explicit binding with .call( ) and .apply( ) functions.

For example, I want to ensure when I call printThis, the invocation context is my newObject.

const newObject = { }

someObject.printThis.call(newObject)
// this = newObject

Wow. You’re a wizard Harry!

When we explicitly bind a invocation context (this value) for a function, we override the implicit this value.

If we were not messing around and wanted to ensure that a function always referred to the same context, we would use the .bind( ) function. Its important to note that the .bind( ) function returns a new function with a permanent new this value.

const hardBoundPrintThis = printThis.bind(newObject)

hardBoundPrintThis()
// this = newObject

In strict mode, the value of this is undefined. You can call a function which references this to find out if you are strict mode…

function amIInStrictModeOhGod(){
   return !this;
}

amIInStrictModeOhGod()
//if we are in strict mode, will return true

“But what about arrow functions Carly?!?!?!”: I hear you cry in a panic, “How does the value of this change???”

Calm thyself!

Arrow functions inherit this from the parent scope of where they are defined. They do not have their own binding to this. Because of this, they can make poor methods. Sometimes you might end up trying to reference a property on an object, but because you forgot that the arrow function does not have it’s own this, you will get an error:

const wowAnObject = {
  fancyProperty: 'So fancy!',
  anArrowFunction: ( ) => {
       return this.fancyProperty
  }

wowAnObject.anArrowFunction()
// error!

Trying to access fancyProperty will throw an error because the parent context of this method is the global window, which does not have a fancyProperty.

However, this aspect of arrow functions (inheritance of the invocation context) can be beneficial when generating classes…

class BestComponent extends React.Component {
  constructor(props) {
    super(props)
  }

  clickHandler = () => {
    console.log('this =', this)
  }

  render() {
    return <button onClick={this.clickHandler}>Wahoo!   
           </button>
  }
}

Wherever this button is instantiated, because the clickHandler function was defined as an arrow function within the BestComponent class object, the lexical context of clickHandler will that of its parent, ie the BestComponent. You don’t have to use the .bind( ) method to ensure that it is always connected to BestComponent.

Thoughts!

  • This is generally referenced within a method of an object
  • This values can be implicitly, explicitly, or hard bound
  • In general, it’s usually best to avoid utilizing this inside of arrow functions due to the potential complexities of the parent lexical scope.

Sources / References:

Flanagan D. Javascript: The Definitive Guide. 7th ed. Sebastopol: O’Reilly; 2020.

‘Understanding “this” in javascript with arrow functions’, Dario Garcia Moya, https://www.codementor.io/@dariogarciamoya/understanding-this-in-javascript-with-arrow-functions-gcpjwfyuc

‘Understanding “This” in JavaScript’, Dario Garcia Moya, https://www.codementor.io/@dariogarciamoya/understanding–this–in-javascript-du1084lyn

Categories
Tech

Redux: when to use it and when to lose it

Some things you want to use a lot of the time (clothes). Some things you want to use sometimes (tire pressure gauge) and somethings barely ever (this hat). I hear you ask: “But what about the popular Javascript state management tool Redux Carly? When do I use that?”

Well, it’s your lucky day because I am here to provide some clarity on when implementing Redux is a good idea and when to skip it. It is a tool that many people have strong opinions on, so let’s dive into it!

If you are unfamiliar, Redux is a Javascript library written by Dan Abramov and Andrew Clark (of React fame). React already has built in state management (useState, useContext etc), but Redux was specifically designed to manage complex state in larger applications, and it can be used outside of React (such as in Angular).

The createStore function is the heavy lifter in the Redux library. From the docs (I added comments):

import { createStore } from 'redux'

//initialize a reducer here
function todos(state = [], action) {
  switch (action.type) {
    //initialize some state 
    case 'ADD_TODO':
      return state.concat([action.text])
    default:
      return state
  }
}

//initialize the store  
const store = createStore(todos, ['Use Redux'])

// update the store
store.dispatch({
  type: 'ADD_TODO',
  text: 'Read the docs'
})

console.log(store.getState())
// [ 'Use Redux', 'Read the docs' ]

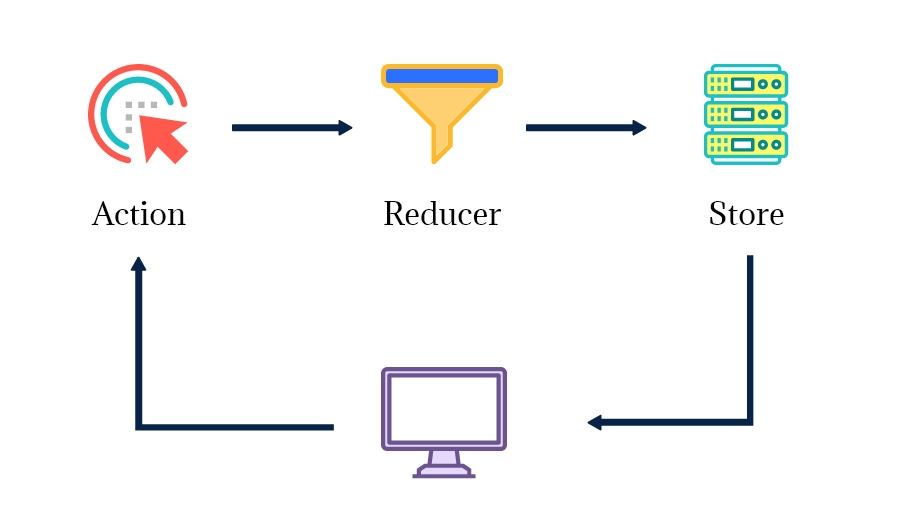
The createStore function takes three arguments: a reducer function, the initial state, and any store enhancer functions. The reducer function is intended to return the next state tree, which is rendered relative to the supplied action and state. The state tree which is returned is an object called the Store. The enhancer function (or functions) are intended to allow for the utilization of various middleware tools.

So, similar to useReducer, the way to change/affect the Store is by dispatching an action onto it. However, unlike useReducer, this is the only way to affect the state in the Store. By doing this Redux encourages very strongly directed flow of information in the app, enforcing that all state changes are directed to the global Store using the global dispatch function.

https://celestialsys.com/blog/redux-fundamentals-building-blocks-and-data-flow/

But, you might be saying, “But what if I just want to move my useReducer up into the top level of my app? How is that different from Redux?” I mean, that is essentially how Redux works. However, with Redux you have a clear pathway for unidirectional state flow at a global level in your app out of the box, in addition to the ability to implement lots of cool middleware like the action-logger, which helps you debug complex state. So if you have a need for predictable, clearly enforced data flow in a complex app, don’t reinvent the wheel, and try out Redux.

However, there are some tradeoffs. Dan Abramov himself says that the library is “not designed to be the most performant, or the most concise way of writing mutations. Its focus is on making the code predictable.” Its intent is to help engineers untangle complicated, shared state in complex applications. If you are writing an app with relatively simple state, then Redux is likely entirely unnecessary.

Ultimately, useReducer, useContext, and Redux can all be used in conjunction to manage state in large, complex ecosystems, as its intended purpose was to impose predictability and stable, unidirectional dataflow.

Sources:

  1. https://redux.js.org/faq/general#:~:text=Redux%20is%20most%20useful%20in,worked%20on%20by%20many%20people
  2. https://changelog.com/posts/when-and-when-not-to-reach-for-redux
  3. https://medium.com/@dan_abramov/you-might-not-need-redux-be46360cf367
  4. https://blog.isquaredsoftware.com/2017/05/idiomatic-redux-tao-of-redux-part-1/#how-redux-actually-works
  5. https://www.robinwieruch.de/redux-vs-usereducer/
  6. https://stackoverflow.com/questions/54576865/when-to-use-native-react-usereducer-hook-and-how-it-differentiate-from-redux
Categories
Tech

React Server Components

You know when you load a site, and random parts of the page seem to take much longer to load than others? In a React site, this is often because one component sits within another. In order to load the child component, whatever data that is needed to render the parent is fetched first, thus causing a delay in loading the child.

function MyProfile({person}) {
 return(
  <MyProfileTheme theme={person.theme} > 
    <MyFace name={person.name} />
    <MyInfo info={person.info} />
  </MyProfileTheme>
)
}

However, when it comes to addressing this issue, there are some considerations. If the developer wants the code to be easily maintainable, they would want the data fetching for each component to be contained within the component itself, as opposed to being coupled to the root component.

export function MyProfileTheme({theme}) {

 const individualTheme = fetchMyTheme() 
 return <IndividualTheme/>

}

But, if components are nested within each other, we get a cascade of fetch requests, as mentioned previously, known as waterfalling. For each request, the client has to make a fetch request, wait for the server to return the data, and then as soon as that is complete, make another. This can definitely affect performance!

Last year, the React team at Meta began developing the concept of moving React components into the server, so that the client only makes one request to the server.

https://dev.to/nas5w/what-is-the-difference-between-server-side-rendering-ssr-and-react-server-components-5339

A new type of tag is added to a file name to indicate to React that the file is to be rendered on the server.

App.server.js

(as opposed to Root.client.js)

An important benefit of writing components in this way is that if hefty libraries or dependencies are utilized in a component which is rendered on the server, these dependencies do not have to be rendered by the client.

import { ClunkyDependency} from "somewhere"

function MyProfile({person}) {

const importantThing = ClunkyDependency()

 return(
  <MyProfileTheme theme={person.theme} > 
    <MyFace name={person.name} />
    <MyInfo info={person.info} />
  </MyProfileTheme>
)
}

If MyProfile is a Server Component, then ClunkyDependency is not passed to the client in the bundle. Yay!

However, there are some constraints to utilizing server components, namely that it, in an of itself, cannot be interactive. Functions like useState or event handlers cannot be utilized within a server component. However, they can still import client side components which are interactive, but all the interactive logic must be contained within the child client component.

Additionally, any props passed from the parent server component to the child client component must be serializable, ie then can be encoded into JSON.

export function MyProfileTheme({ theme }) {
  const individualTheme = fetchMyTheme();
  return (
    <>
      <IndividualTheme>
        <ThemeHeader
          function={() => doSomething()}
          title={<div>Header Text</div>}
        />
      </IndividualTheme>
    </>
  );
}

For example, if MyProfileTheme is a sever component, then we cannot pass the ‘function’ prop to the ThemeHeader (functions are not serializable). However, we can pass JSX!

Server Components vs Server Side Rendering

Server components are different from SSR. Server side rendering is when the server renders React into HTML quickly, allowing for a first contentful paint of the page, while the Javascript is still being fetched/applied. This means that the initial visuals of the page load rapidly first, while the interactivity/etc loads next.

Conclusions

All in all, server components provide a helpful option for improving performance and reducing bundle size.

  1. https://www.youtube.com/watch?v=TQQPAU21ZUw&ab_channel=MetaOpenSource (Data Fetching with React Server Components)
  2. https://dev.to/nas5w/what-is-the-difference-between-server-side-rendering-ssr-and-react-server-components-5339

Categories
Tech

Gatsby 5: New improvements

Gastby 5 went live recently with some pretty cool improvements! I’ll go over a few of them here.

Slice API

The Gatsby Slice API allows you to make components called Slices, which when they are updated, Gatsby only builds and ships changes for that little ‘slice’ of the site. This means that only the parts of the site in a changed Slice are rebuilt, improving performance in build time. Seems like it would be handy for navbars, footers, snackbars/banners etc.

Instantiating a slice seems fairly simple, according this example from Gatsby where a site-wide header component has been elected to become a Slice:

exports.createPages = async ({ actions }) => {
  actions.createSlice({
    id: `header`,
    component: require.resolve(`./src/components/header.js`),
  })
}

After this, the <Slice/> component is called in the place of the Header whereever the Header was called:

export const DefaultLayout = ({ children, headerClassName }) => {
  return (
    <div className={styles.defaultLayout} />
-     <Header className={headerClassName} />
+     <Slice alias="header" className={headerClassName} />
      {content}
      <Footer />
    </div>
  )
}

Again, there are number of other implementation details, but this general concept seems easy enough and is a cool way to cut down on build times.

Partial Hydration

This improvement is still in the beta stage. Hydration is the process by which Javascript converts a static HTML file into an interactive web page, usually by attaching event handlers to the HTML elements. The HTML is rendered on the server and sent to the browser first, allowing useful data to be displayed to the user before it becomes interactive. This improves user perception of loading times.

However, Gatsby’s partial hydration feature relies upon React server components to hydrate ‘islands of interactivity’ that are hydrated individually. This would improve performance and user impressions of the page.

Head API

Gatsby now includes a built in Head component, allowing you to configure the <head> element for a page. According to Gatsby, this component is `more performant, has a smaller bundle size, and supports the latest React features’ than other libraries like react-helmet that do similar things.

A look at implementing it:

export const Head = () => (
  <>
    <title>Hello World</title>
    <meta name="description" content="Hello World" />
  </>
)

This does look pretty easy to implement, and also it allows you to export this component from one page and use it on another.

Gatsby Script

Like the Head API, the Script API is Gatsby’s is also an optimization of a html element, this time the <script> tag. Their Script component allows developers to specify different loading strategies which Gatsby describes as strongly performant, using the ‘strategy’ prop. This component essentially gives developers more flexibility and control over <script> elements.

Copycopy code to clipboard
import { Script, ScriptStrategy } from "gatsby"

<Script src="https://my-example-script" strategy={ScriptStrategy.postHydrate} />
<Script src="https://my-example-script" strategy={ScriptStrategy.idle} />
<Script src="https://my-example-script" strategy={ScriptStrategy.offMainThread} />

Seems simple enough! I’d imagine there might be times where really granular script management would come in handy.

There were several other updates that I won’t go into detail here, but you can check them out at here!

  1. https://www.gatsbyjs.com/docs/reference/built-in-components/gatsby-slice/
  2. https://www.gatsbyjs.com/docs/how-to/performance/using-slices
  3. https://www.gatsbyjs.com/docs/conceptual/partial-hydration/
  4. https://www.gatsbyjs.com/docs/reference/built-in-components/gatsby-head/
  5. https://www.gatsbyjs.com/docs/reference/built-in-components/gatsby-script/

Categories
Tech

Next.js 13: Turbopack

At the Next.js Conference 2022, Next.js 13 was announced and it’s most important updates explained. They fall into three major categories:

  1. New compiler infrastructure
  2. New rendering infrastructure
  3. Additions/improvements to their component toolkitI’ll psend the most

I’ll dive into the first point here in this post.

New Compiler Infrastructure

Perhaps the most exciting/interesting aspect of the release was the introduction of Turbopack, a Rust-based successor to Webpack. By switching to a Rust based compiler, Vercel claims to have surpassed the performance limitations enforced by Javascript-based tooling. It is cool/interesting to note also that the author of Webpack, Tobbias Koppers, was deeply involved in the development of Turbopack.

These improvements come with some pretty drastic peformance improvement claims, including being 700x faster than Webpack, and 10x faster than Vite1. Personally, I am always a little skeptical of performance parameters when presented in a marketing context, so I am a little curious as to understand how/why this is so fast, especially when compared to it’s competitors at Vite.

Turns out there is a bit of controversy on that last point, according to some developers at Vue and elsewhere online4.

However, Rust is catching on a lot of places as an alternative to Java and Javascript, due to its security and performance2. Major tech companies like Google, Amazon, and Microsoft have been utilizing it2. Vercel CEO Guillermo Rauch explains the other reason why the compiler is so much faster is due its model of incremental computation: when a change is made, only aspects of the model which are affected by the change are recomputed3. This is modeled after Google’s build system Bazel3. Vercel claims that the improvements in build time are especially important for scalability, as the performance improvements are even more apparent in larger applications1.

When Webpack was initially developed, it was done so with the idea of addressing the compilation needs of SPAs3. Although the SPA is still an integral part of the web, many sites have evolved beyond this paradigm and have expanding compilation needs. It does seem like it is about time for a next-generation bundler. Lets see how the development community responds!

Sources:

  1. https://nextjs.org/conf

2. https://thehustle.co/11072022-rust/

3. https://devclass.com/2022/10/25/webpack-founder-debuts-rust-based-turbopack-that-is-700x-faster/

4. https://javascript.plainenglish.io/is-turbopack-really-10x-faster-than-vite-bd9c70837990

Categories
Tech

The differences between var, let, and const

What’s the difference between var, let and const? Good thing you have this handy blog post to guide you!

The primary differences can be singled down to

  • SCOPE
  • REDECLARATION
  • REASSIGNMENT
  • and HOISTING

Scope:

Scope refers to the context in which the variable is able to be referenced.
  • var:  local (within a function)* or global **
  • let:  block scoped
  • const:  block scoped

*Imagine a function, with is an inner block (such an ‘if’ block). If a variable is reassigned within this inner block, and then called outside of the block (but still within the outer function) it will retain its reassigned variable.

**If a variable is declared with var in the global context, it actually becomes a property of the window object.

Reassignment:

The action of assigning a new value to a variable.
  • var: can be reassigned
  • let: can be reassigned
  • const: cannot be reassigned***

***does not mean immutable! When the variable for an object is assigned, the properties and attributes of the object can be changed. But the reference in memory will only be able to point to one place.

Redeclaration:

The re-initialization of a new variable.
  • var:  can be redeclared
  • let: cannot be redeclared
  • const: cannot be redeclared

Hoisting:

Referencing a variable before it is declared.
  • var:  hoisted value= undefined
  • let: hoisted value= uninitialized and will lead to error
  • const: hoisted value= uninitialized and will lead to error


Categories
Tech

AJAX: A Good Four Letter Word

The Beginning

In a time, long, long, long ago, in 1995, there was a browser called Netscape.

Netscape Logo - LogoDix Ah, old memories.

The minds behind this browser had begun to realize that the simple static webpages of the internet were restrictive, and lacked the ability to respond dynamically to user interaction or input. Netscape wanted to respond to this need by generating reactive functionality within their browser, but they felt the contemporary language of the web, Java, was ill-suited to the task.

So they gave Brendan Eich, the inventor of Lightscript and clearly someone capable of working under pressure, 10 days to generate a programming language to perform this task. And lo and behold, he delivered!

Lightscript (the precursor to Javascript) was developed. Microsoft also developed it’s own language, reverse-engineered off of Lightscript, with significant differences to the Netscape version. These two versions of JS battled it out in something old people remember as the ‘browser wars’ (just kidding you guys). Eventually this was fixed when the ECMA standards specified a single version of the language and we all lived happily ever after.

But who cares? Well, Brendan probably cares. And you should too, because the capabilities that Javascript provided to the browser transformed the way we experience the Internet.

The Age of the Static Page

Imagine only being able to click on buttons, that simply took you to another page. Imagine inputing information in a search box, that when entered also took you to another page. If you wanted to further filter it, you had to reload the page. Every time you wanted to see different data, or have something respond on the page, you had to re-load the page or navigate to a new page.

4 signs your cat is bored and 8 easy solutions to enrich their lives

Sounds real fun. 

Obviously this sucked. Lightscript, and eventually Javascript was developed to address this issue. Eventually, a technique called Dynamic HTML was developed which allowed browsers to move things around the screen, and even change in response to user interaction. In addition to this, Microsoft developers had developed a technology called XMLHttpRequest  in 2000 but after the web development bubble burst and web development in general slowed dramatically. Asynchronous server communications were around, but they were not particularly prominent.

Forge A Ring Of Power And We'll Give You An Orc Name “And some things that should not have been forgotten were lost.”

However, in 2005, a developer named Jesse James Garrett wrote an essay describing a methodology his team utilized, where several technologies were used to mimic the responsiveness of desktop applications. He coined the combination of technologies that enabled this responsiveness AJAX.

AJAX is Born

AJAX stands for Asynchronous Javascript and XML. In Jesse’s own words:

“The Ajax engine allows the user’s interaction with the application to happen asynchronously — independent of communication with the server.”

Information can be displayed on a webpage, whilst data can still be being fetched or processed in the background. This meant that changes could be made to the page or part of the page, and the whole page would not have to be reloaded. This made pages more interactive and performant.

The term AJAX refers to the technologies which make this kind of webpage possible.

How specifically do these technologies function? Well, in order to communicate with another server via Javascript, you need a JS object to provide that functionality. The object we utilize is the aforementioned XMLHttpRequest.  One of the most popular APIs for working with this object to communicate with serves is called the Fetch API. But! Before we talk about the Fetch API, we need to talk about Promises, the foundational modern JS methodology for asynchronous operations.

Pinky Swear Poster | JUNIQE “I promise to return the result of this asynchronous operation, come hell or high water!”

Promise Me This

Intro to Promises

A promise, I should remind you, is (and I stole this definition pretty much straight from MDN so don’t sue me):

  • a JS returned object which represents the result of an asynchronous operation,
  • to which you attach callbacks,
  • which are then executed depending on what the the state of the promise is when it completes.

Check out this code:

getSomeData("urlWhereDataLives").then(doThisFunction);

Our function getSomeData is an asynchronous one. While that request to the url is pending, the function getSomeData returns a promise. The promise (which is a JS Promise object) has a then() method, which we invoke and pass a callback function. When the data we requested in getSomeData finally arrives, it is passed to the callback function we passed to then().

If you want to handle errors you can pass it a second function:

getSomeData("urlWhereDataLives").then(doThisFunction, oopsErrorHappened);

If there is an error, the second callback is invoked, oopsErrorHappened. However, this is not as common as using the catch() statement:

getSomeData("urlWhereDataLives").then(doThisFunction).catch(oopsErrorHappened);

This seems simple, but in the words of David Flanagan,

“Promises seem simple at first….But they can become surprisingly confusing for anything beyond the simplest use cases.”  – Javascript: The Definitive Guide 

Real talk, David. Real talk.

Promise Chaining

So getSomeData was an asynchronous function. What if we want to parse the data returned by it in another asynchronous operation? Enter Promise chaining:

getSomeData("urlWhereDataLives").then(parseThisData).then(doSomeFunction)

The function parseThisData initiates an asynchronous operation with the results of getSomeData. Then when parseThisData is complete, the results are passed to doSomeFunction.  In this way, the results of one asynchronous operation are passed to another by using the function then() attached to the new Promise objects created when the asynchronous functions are invoked.

Did that make sense? I hope that made sense because this train is rolling on! Choo choo!

Promise Terminology

There are some very specific terms for talking about Promises.

A promise can have 3 states:

  • pending – the Promise has no value, it’s chilling
  • fulfilled – Sucsess! Some kind of result value has been assigned to the promise
  • rejected – no result could be assigned.

When the Promise leaves it’s pending state, it is resolved*.

  • resolved – the Promise is either fulfilled or rejected

*According to the Stack Overflow answer which can be found in my references, this is not *technically* accurate, but for the sake of working with Promises, I will call it good enough.

Now lets talk about a common API for handling async operations!

Go Fetch!

The Fetch API is a lovely interface that saves us from the scary oogey-boogey man that is the XMLHttpRequest API, which looks like this:

function makeRequest() {
    httpRequest = new XMLHttpRequest();

    if (!httpRequest) {
      alert('Giving up :( Cannot create an XMLHTTP instance');
      return false;
    }
    httpRequest.onreadystatechange = alertContents;
    httpRequest.open('GET', 'test.html');
    httpRequest.send();
  }

Ugh. Even David Flanagan calls it “old and awkward”.

Old Angry Man Threatening With A Cane In Studio Stock Image - Image of frustration, grey: 178559101 XMLHttpRequest: “Hey, you better watch the way you talk about me!”

Fetch has a nice, happy 3 step process for making HTTP requests. I will quote my favorite JS book, “Javascript: The Definitive Guide” to summarize them:

  1. Call fetch(), passing the URL whose content you want to retrieve.
  2. Get the response object that is asynchronously returned by step 1 when the HTTP response begins to arrive, and call a method of this response object to ask for the body of the response.
  3. Get the body object that is asynchronously returned by step 2 and process it however you want.

And that’s it! Nothing bad ever happens and that’s all you ever need to think about! Yay!

This is what heaven actually looks like (according to people who have been there) - FamilyToday Thank Goodness! All my problems are solved! This must be Heaven!

Just kidding. It’s usually not that simple. Let’s dive in, shall we?

It’s also important to note that the Fetch API is Promise-based, and there are two asynchronous steps.

  1. Call fetch(), passing the URL whose content you want to retrieve.

Angry Baby Boy In Green And White Check Shirt Give me your basic authorization credentials in your HTTP request header NOW!

Calling fetch initiates an asynchronous operation. The Promise returned by fetch() resolves to a Response object.

Huh?

Well, this sentence just means exactly what it says: when the Promise is resolved, it is now a Response object, thanks to the magic of the Fetch API. We like the Response object, because it offers us all kinds of fun stuff, including two very important methods for parsing data we get from HTTP requests: json(), and text(). More on that later though.

Very often the API that you are requesting stuff from needs you to request it in a specific way. You may need to include authorization credentials, or…other stuff.

So when you call fetch, you might need to provide two arguments: one being the API url, the other being the necessitated header information.

//make new Headers object
let headers = new Headers();

//set the header
headers.set("Authorization", 'Basic ${btoa('${myUsername}:${password}')}');

//include it in fetch request
fetch("myAPI/whereIGetStuff", { headers: header }).then(doSomeStuff)
2.Get the response object that is asynchronously returned by step 1…and call a method of this response object…

Sweet! I got my data from the API in my cool Response object! Now what?

Most commonly the response from a server is a JSON object. So we might want to parse it as a JSON object like in the following code, calling the json() method of the Response object…

fetch("myAPI/whereIGetStuff.com")
    .then(response => response.json()) 
    .then(output => console.log(output))

Or we might want to check the status:

fetch("myAPI/whereIGetStuff.com")
     .then(response => console.log(response.status))
3.Get the body object that is asynchronously returned by step 2 and process it however you want.

When we call fetch() to get data from some browser, the second step, the parsing of the Response into JSON or text, is itself an asynchronous operation.

So another Promise object is created, which we then pass another callback function to invoke when this second Promise is resolved:

fetch("myAPI/whereIGetStuff.com")
.then(response => response.json()) 
.then(myData => console.log(myData))

This callback function is where we finally get to handle our data!

Goodbye Yellow Brick Road

Now, we have come so far!

You were introduced to the history, and therefore necessity of asynchronous code, along with its utility in promoting interactivity in webpages.

You were introduced to the fundamental technology of asynchronous code: the Promise.

And finally you were introduced to one of the most popular and useful API’s for working asynchronously: the Fetch API.

Now forth, and happy asynchronous development!

References:

Marcos Sandrini, JavaScript: its history, and some of its quirks, Nov 3 2021, https://msandrini.medium.com/javascript-its-history-and-some-of-its-quirks-6d5da5e8a47

Aaron Swartz, A Brief History of Ajax, Dec 22 2005, http://www.aaronsw.com/weblog/ajaxhistory

Jesse James Garrett, Feb 18th 2005, Ajax: A New Approach to Web Applications, https://courses.cs.washington.edu/courses/cse490h/07sp/readings/ajax_adaptive_path.pdf

Using Promises – JavaScript | MDN. Developer.mozilla.org. https://developer.mozilla.org/en-US/docs/Web/JavaScript/Guide/Using_promises. Published 2021. Accessed December 16, 2021.

Promise – JavaScript | MDN. Developer.mozilla.org. https://developer.mozilla.org/en-US/docs/Web/JavaScript/Reference/Global_Objects/Promise. Published 2021. Accessed December 16, 2021.

Fetch API – Web APIs | MDN. Developer.mozilla.org. https://developer.mozilla.org/en-US/docs/Web/API/Fetch_API. Published 2021. Accessed December 17, 2021.

Flanagan D. Javascript: The Definitive Guide. 7th ed. Sebastopol: O’Reilly; 2020.

What is the correct terminology for javascript promises. Stack Overflow. https://stackoverflow.com/questions/29268569/what-is-the-correct-terminology-for-javascript-promises. Published 2015. Accessed December 17, 2021.

Categories
Tech

Rendering Schmendering

How does the browser actually show you a webpage? When your browser receives the data necessary to display a webpage, how does it actually show you the page? The answer is through rendering! Let me take you down the yellow brick road of rendering known as the ‘critical rendering path’!

(Don't) Follow the Yellow Brick Road | by Elena Boskov-Kovacs | Medium “Theres no place like the render tree, Toto!”

The Beginning

The browser actually receives the data to make a webpage in the form of binary strings. 8 units of binary code evaluate to 2 characters known as a byte. So it parses the binary bytes into characters, in a process known as ‘conversion’.

Bits & Bytes A byte which evaluates to the characters ’77’

These characters are then converted into tokens, which look like the html tags we are more familiar with: ‘<html><head>…’. In a fancy process that I don’t totally understand called ‘lexing‘ these tokens are converted into objects known as nodes.

HTML Parsing

These nodes are then assembled using the DOM API provided by the browser in something called the HTML DOM (document object model). This is an essentially a flowchart which plots the relation of all the HTML objects within the page to each other.

CSS Parsing

In the process of parsing the HTML document, the browser will find a link which directs the browser to the CSS stylesheet. The browser then parses this and generates what is called the CSSOM, or the CSS Object Model. The CSSOM is also a tree structure, indicating the dependencies and relationship of style properties to the HTML objects.

Best Guide On Render Blocking Resources - Page Speed OptimizationLooks like there’s CSSomething cool going on here with this tree

The Render Tree

The CSSOM and the HTML DOM are combined into the render tree. The browser is ready to begin on the next step…

Layout

The Pros and Cons of Buying A New Construction Home in Texas Its sort of like assembling the scaffolding for a house…

This sounds like a concept but in this context it is actually a process: the browser sets up the elements of the render tree on the page, going in order of the flow of the document. So things like the location and size of the header, paragraph elements, navigation bar, paddings and margins are oriented on the page.

Painting

The fun step! The browser is now going to apply color to the page. It will look at the render tree for background colors, images, and fonts to prettify your page and assign color values to all the pixels.

image of clown applying clown  makeup

The page before painting > the page after painting

Compositing

The final step is compositing, where the browser deals with things like opacity and object transformations. So if you hover over a button, and the button gets bigger, this is a function which is handled in the compositing stage. These changes add important interactivity and polish to the page.

—————————————————————————-

And that’s it! Now you have your beautiful web page just as the designer intended! Unless you’re in IE11….

References:

Hansa U. An Introduction To Browser Rendering.; 2016. https://www.youtube.com/watch?v=n1cKlKM3jYI. Accessed December 16, 2021.

Ilya G. Constructing the Object Model. Google Developers. https://developers.google.com/web/fundamentals/performance/critical-rendering-path/constructing-the-object-model. Published 2021. Accessed December 16, 2021.

Critical rendering path – Web Performance | MDN. Developer.mozilla.org. https://developer.mozilla.org/en-US/docs/Web/Performance/Critical_rendering_path. Published 2021. Accessed December 16, 2021.

Categories
Tech

CSS position property

The CSS ‘position’ property is a fundamental aspect of page design in CSS.

Read on to get a breakdown of how this important component works!

static

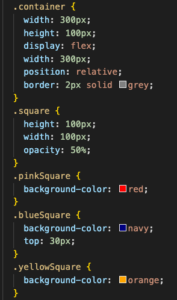
If the position property is not set, it is automatically ‘static’. Setting the left, right, bottom, top and z-values in static mode will have no effect. It will just exist within the normal page flow.

Notice how the blue block has a ‘top’ value of 30px, but the blue block has the same vertical position as the other blocks.

relative

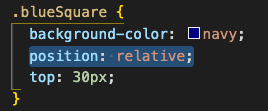
Now things start to get fun! If left, right, top, bottom or z-values are set for an element in relative mode, the adjustments will be applied relative to the elements default position.

absolute

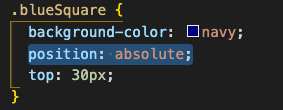
When an element’s position attribute is set to absolute, its position is determined relative to the container it is within (that or its closest position ancestor). It is taken out of the normal flow of elements in the document.

fixed

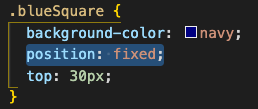
Elements with the fixed position are positioned relative to the viewport. They are taken out of the normal flow of the elements in the document.

sticky

Sticky positioning means that an element will behave as though it is relative, until it crosses a positional threshold, and then it is treated as fixed. It is also taken out of the normal flow of the document.

References:

  1. httpss://developer.mozilla.org/en-US/docs/Web/CSS/position
Categories
Tech Uncategorized

nth-child vs. nth-of-type

These are two CSS selectors which tend to confuse people quite a bit. A key difference is which elements are counted and how.

I found that it helps a lot to separate the children into two lists.

Let me explain!

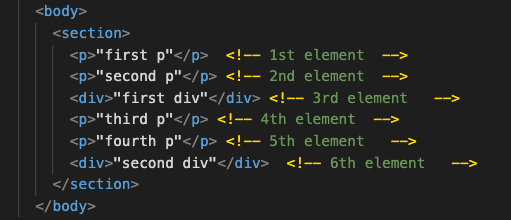
Lets use this block of code to elaborate how these two selectors work:

:nth-of-type()

First, let’s start off looking at :nth-of-type(). It takes one argument, which is either a number or a formula to indicate the positions we are interested in.

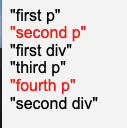
Is it what you expected?

This is how I like to think of this selector in plain english. Split the children into two lists.

  1. Make a list of the p elements
  2. Of that list, we select the even numbered p elements

Note that, in this case this does NOT mean we select the 2nd, 4th, 6th etc. children of the div. We select the2nd, 4th, 6th etc. p elements relative to the other p elements. If we wanted to select the 2nd, 4th, 6th etc elements (i.e. the even elements) we would not specify an element type

:nth-child()

This selector is more straightforward.

To translate this selector into plain english as well (again using the above example):

  1. Make a list of the even elements
  2. Of that list, select the div elements

And that’s it! It’s really not as complicated as it looks, as long as you are clearly separating the children into two lists in your head:

  • One list of all the elements of the selected type within the container
  • One list of the specified numerical placement of these elements

And ensure that you are starting with the right list! 

Note: both of these selectors are CSS pseudo-classes which will match certain elements when they are in a specific state (in this case, the state refers to the numerical position the element occupies.)